


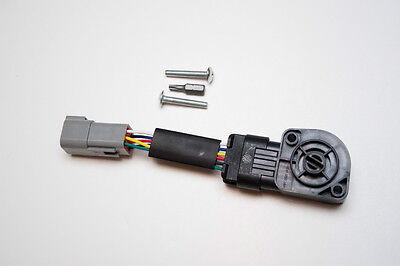
TPS APPS Throttle Position Sensor for Dodge Cummins 98-04 Bell Crank Manual 5.9L
- Item condition:
- New
- Ended:
- Feb 7, 06:43 PST
- Price:
- $199.00 View item
- Shipping:
- FREE
- Item location:
- Kaysville,UT,USA
- Ships to:
- Worldwide
Item specifics
-
- Part Brand:
- Diesel Auto Power accelerator pedal position
-
- Manufacturer Part Number:
- 53031576 53031576AD 53031576AE 53031576AH
-
- Interchange Part Number:
- Manual Transmission 5spd 6spd Trans Mopar Belcrank
-
- Other Part Number:
- BLUE CHIP DIESEL 3970085, AP63427, 53031576AF
-
- Warranty:
- Yes
-
- Will fit Ford and Freightliner:
- with cummins 5.9L engine built before 01/2004
Manual transmission
The most common problem when a APPS sensor is failing is a "Dead Pedal" You'll be driving down the road and hit the go pedal and NOTHING. A real annoying problem. The most common codes are the 0121, 0122, 222, or 223 code. Another issue is a surging or a bucking, this often times will not throw any codes. The other cause of the "Dead Pedal' is a failing vp-44 injector pump, I have those available (for less than $1000) . Common codes for Injector pump are 0215,0216,0251, 0252,1688,1689
These commercial grade Sensors are a direct bolt in replacement on a 24V 98.5-03 and some 04 trucks. 04 look at the engine bay picture Take notice to the large black plastic cover in the center of the picture. That is the APPS assembly, if you have that then this Sensor will work for you.
Item carries a 1 year warranty from time of receipt. To have item warranted you must contact us prior to removing item from the truck. Troubleshooting must be done prior to return to verify the type of failure of the product. Once the problem is determined an RMA number will be issued and shipping arrangements will be determined.
APPS SENSOR INSTALLATION INSTRUCTIONS
1. Disconnect battery cables
2. Remove the plastic APPS cover.
Next remove the six, 10 mm headed bolts that hold the bellcrank assembly on.
When that is removed, you will see the sensor on the back. A T20 Torx is
needed here.
*Caution, these screws have loctite on them. So make sure that the bit is
engaged fully into the screw head, so they do not strip, or you will need to use
visegrips to remove them. NOTE: 2 new screws are provided.
3. After the old sensor is removed, take the new sensor and look at the side
that bolts to the bracket. In the center, you will see the slot that engages in
the tang of the bellcrank shaft. Next, line up the slot with the tang and push
the sensor onto...
